


Building application using NodeJs, everyone might want to authenticate users into an app that you built. Traditionally using “index.html” a way to send back static HTML or using render(“index”) to render a template markup like plug or ejs, one will use session based authentication most likely. But what do you do when you are using an API to authenticate users? One way you can validate your users is by using JSON web tokens.
Before going deep into the topic, we must know what JSON web token is?
What is JSON Web Token?
A JSON web token (JWT), also known as jot, serves as a short URL-safe method for conveying claims between two parties. The requests in a JWT are encrypted as a JSON object and digitally signed using JSON Web Signature (JWS)
How used to do authentication?
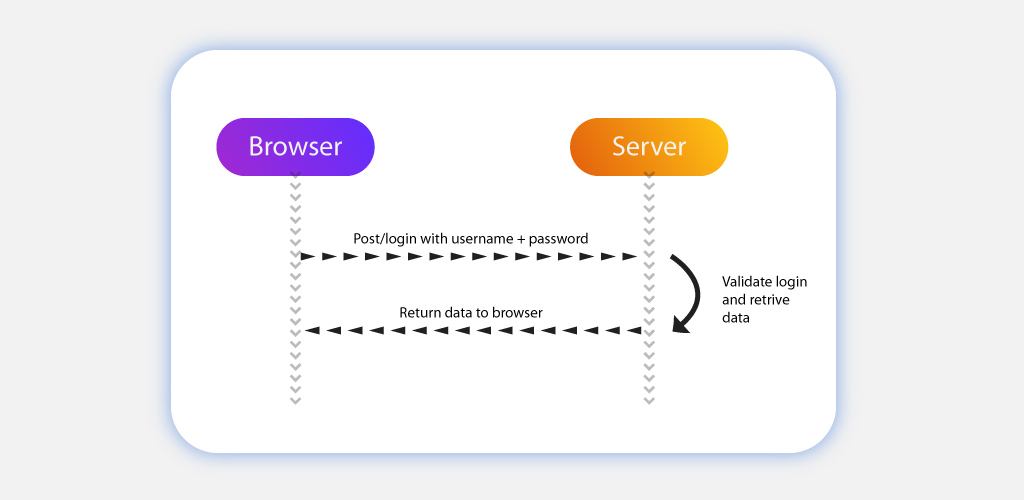
HTTP is a stateless protocol – means it doesn’t remember anything from request to request. If you login for one request, you will forget your password and should need to log in again to make another request. This can get very annoying fast. The traditional solution has been to generate a session that is implemented in two parts:
- An object saved on the server that identifies if a user is still logged in.
- A cookie on the client-side reserves some ID that the server can reference against the session object’s ID.
Cookie-based Auth
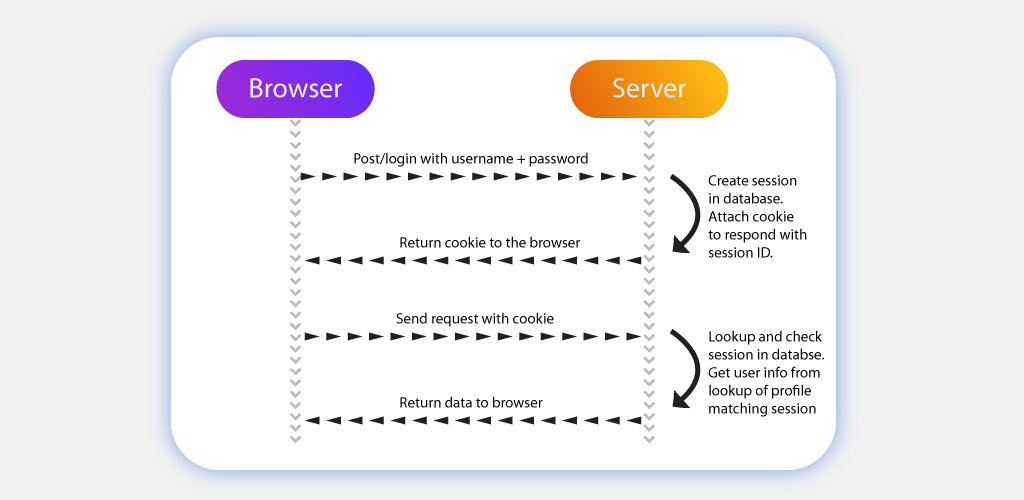
If a user visits a webpage and the server identifies a session cookie, the server will verify if that cookie currently has a session stored with the ID from the cookie. If the session still exists, it will return with the requested web page. When the session object is identified, it retrieves the data within it, enabling the server to “recognize” who you are and what you were doing. If the session is not valid, it returns an error message stating that the request is “unauthorized.”
New sessions can be created by granting a username/password combination to a specific endpoint from a login page. If the server can pair a user with that username and password, it will create a new session object on the server and established a cookie on the client session’s ID for any future requests.
If the user turns off their computer and comes back to the website after some time in the future, then the user can either automatically log in again or can log in via the login page. Once the user logged in, the session can be regained again from the data cached on the server, and the user can go through their data displayed.
Drawbacks with Cookie-based Auth
- Multiple Backends
- Sessions
- Poor Scalability
- Performance issues
- Native Apps
- Cross-site request forgery(CSRF)
- CORS
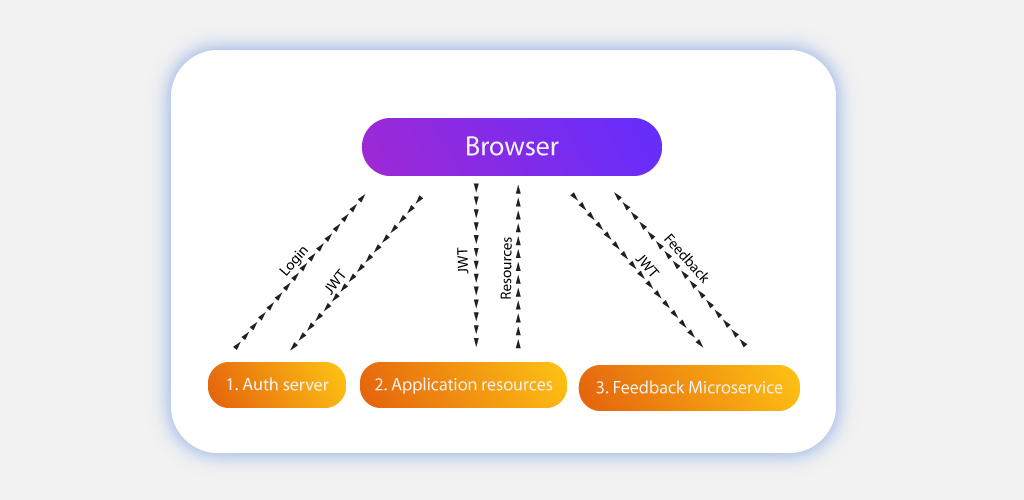
So the concept of JSON web token came into the picture to overcome all these issues.
Q: How JSON Web Token is used to do authentication?
JWTs doesn’t rely on sessions, have no issue with native apps which actually doesn’t need any CSRF protections and also works like a charm with CORS.
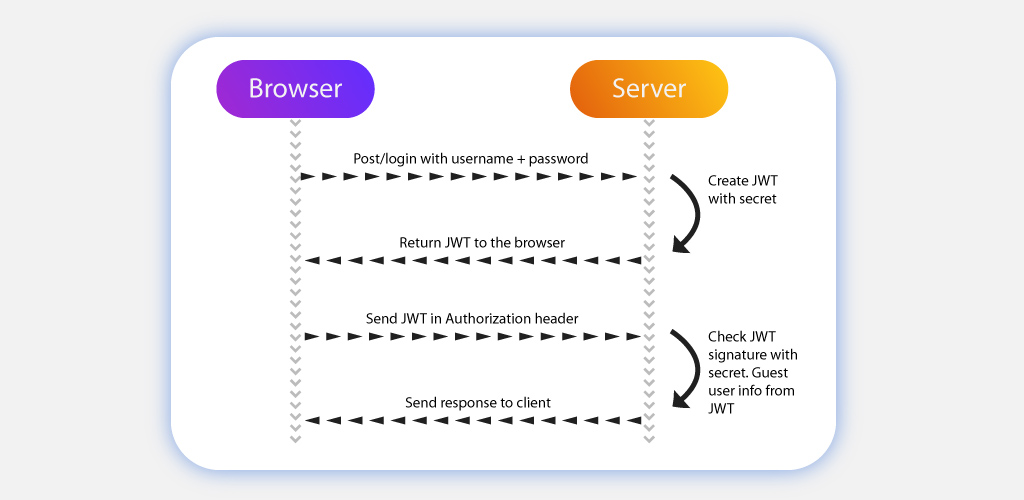
With JWT the user signs up with an app and login in with their credentials, but despite creating the session and setting the cookie, the server sends the user a JSON token instead. Now the user using the token can do whatever they want to do with the server.
Example:
Let’s see with an example: Just like a hotel registration in which the user registers at the front desk and the hotel management at the front desk provides the user with one electronic key with which the user can access your room, the pool, and the garage. But the user can’t open other people’s room, or the user can’t access the manager’s office. Similarly, once the user’s stay ends, they are left with a useless piece of plastic (i.e., the token no longer serves any purpose once it expires).
In a multiple server setup, the user could compare JWT akin to a “Festival Pass.” The user would get at a film or music festival with the Festival Pass whereas an individual movie ticket will grant you to access a single movie whereas a festival pass will allow you to access to any film in the entire festival season at different locations at different times. Likewise, the user can use the generated JWT from one server and use it to authenticate with different servers that share the same verification method. Each of those other servers doesn’t need to call home to ask if the token is ok because they can do a quick computation on the token verification and its signature. It also verifies the expiration time directly without incurring a hit to the database or an additional network request.
Let’s see how JWT can secure your API without crossing your eyes!
API authentication
Specific API resource needs limited access. No one wants one user to be able to change the password of another user, for example. That’s the reason to protect specific resources make users supply their ID and password before allowing access. In other words, the authentication comes into action to authenticate them. The actual difficulty in securing an HTTP API is that the HTTP API pass stateless requests – the API doesn’t know that whether any two requests were from the same user or not.
Let’s dive deep how JWT works?
Q: How JWT works?
When a user creates a JWT, it becomes self-contained, containing all the necessary pieces required to perform desired actions on a server.
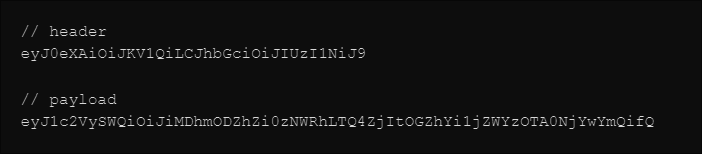
Structure of the token
In general, HTTP requests send JSON web tokens via the header. Here’s what one looks like
There are three main steps, separated by a “.”
- a header
- a payload
- a signature
Now, we will examine the JWT itself, including how it is created and tested, in more depth.
Step 1. Create a HEADER
The header component of the JWT contains data about how the JWT signature should be estimated. A header is the object of JSON in the following format:

In the above code, the value of the “typ” key defines that the object is a JWT and the value of the “alg” key explains that the hashing algorithm used to create the JWT signature component. In the above example code, the hashing algorithm used is HMAC-SHA256 algorithm that uses a secret key, to compute the signature.
Step 2. Create the PAYLOAD
The JWT payload component is the data that’s stored inside the JWT. In the example, the authentication server creates a JWT with the user information stored inside of it, particularly the user ID.

In the above code, we are just putting one claim into the payload. But we can settle as many requests as possible. Various approved claims for the JWT payload include “iss” for the issuer, “sub” for the subject, and “exp” for the expiration time. These lists can be useful while creating JWT, but they are optional. Always remember that the data will affect the overall size of the JWT.
Step 3. Create the SIGNATURE
We compute the signature using the following code

How this algorithm does works is by using the base64url that encodes the header and the payload created in step 1 and step 2. This algorithm then joins the resulting encoded strings together with a period(.) in between them. In the above code, we assign the entered string to the variable “data.” Then, we hash the data string with the secret key specified in the JWT Header using the specified hashing algorithm. We assign the resulting hashed information to “HASHEDDATA.” Finally, we encode this hashedData using base64url to generate the JWT signature.
In the example below, we encode both the header and the payload as base64url:
Then, the user applies the specified signature algorithm with the secret key to the concatenated encoded header and payload. This generates the hashed data required for the signature, meaning the application of the HS256 algorithm with the secret key as the string “secret” on the data string to obtain the hashed data string. After this via base64url encoding the hashedData string, then the user receives the following JWT signature

Step 4: Place all three JWT components together
By following the above steps, we have created the JWT. Combine the header, payload, and signature of the JWT with periods (.) separating them. Use the base64url algorithm to encode the header, payload, and signature obtained in step 3.

Q: How does JWT protect our data?
The intention of using JWT is not to hide data or complex data in any way. The important reason behind using JWT is that an authentic source created the sent data. In the above steps, we encode and sign the data inside the JWT, but we do not encrypt it. The primary purpose of encoding data is to transform the data’s structure, and signing data allows the data receiver to validate the authenticity of the source of the data. So encoding and signing data does not mean for securing the data whereas the primary purpose of encryption is to ensure the data and to prevent unauthorized access.
Step 5: Verifying the JSON Web Token
In the above examples, both the authentication server and the application server know the secret key used to sign the JWT with the HS256 algorithm. When the application fastens up its authentication process, the application server receives the secret key from the authentication server. When the user makes a JWT attached API call to the application, an application can perform the same signature algorithm, since the app knows the secret key as done in step 3 on the JWT. Then the certificate application verifies the signature thus obtained from the hashing operation that matches the signature on the JWT itself. If the signature matches, which means the JWT is valid, that indicates the API call is coming from an authentic source. If the signature doesn’t match, then, it means the received JWT is invalid, that means it may be a sign of a potential attack on the application. By checking the JWT, the application appends a layer of trust between itself and the user.
To conclude
In this blog, we covered everything about what JWT is, how to build and validate them, and how they can secure trust between an application and its users. This is just understanding the fundamentals of JWT and why they are useful. Json Web Token is only one piece of the puzzle in ensuring trust and security in your application. In this blog, we set up JWT authentication using a symmetric key algorithm (HS256). Even you can also use your own JWT authentication in a similar way except using an asymmetric algorithm where the authentication server has a secret key, and the application server has a public key. HTTPS ensures that it prevents unauthorized users from intercepting communication between the server and the user, thereby preventing them from stealing the sent JWT
Krify is the leading mobile app development company in India and UK having well-experienced app developers who work under high pressure having knowledge on all the trending technologies. Talk to us for your requirement and get a free quote on your requirement.